Silent Shark Convoy Attack Doctrine
How to turn a screened merchant column into a planned ambush — then leave before the escorts own your track.
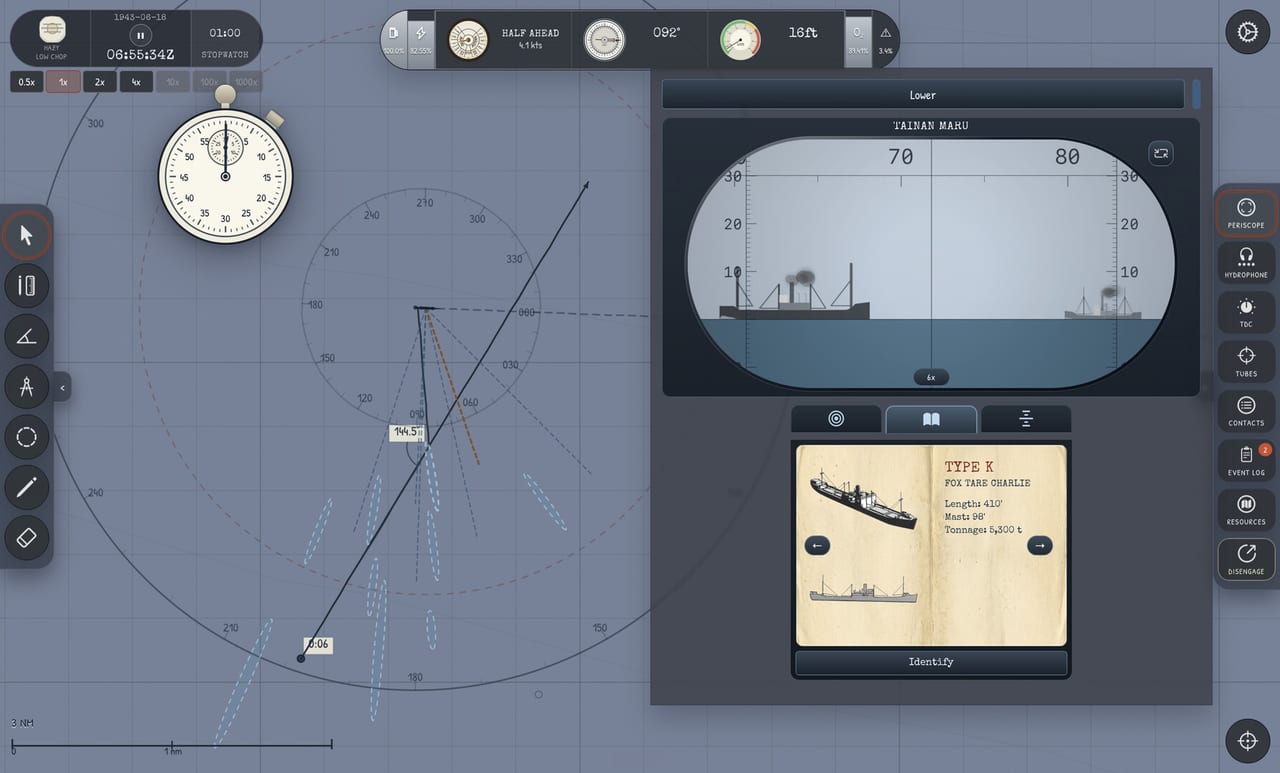
Convoy fights are where Silent Shark’s chart-first design stops being a tutorial and starts grading your judgment. Merchants are the prize; destroyer escorts are the clock. This doctrine page assumes you already know Four Bearings, Stadimeter Range, and How to Use the TDC. If those still feel shaky, drill them in the Scenario Generator before you chase a full column in the Pacific campaign released August 12, 2026.
Silent Shark remains single-player. Nobody else plots your intercept or shares the blame when a noisy depth change hands the escorts a free bearing.
What a convoy actually is
Treat a convoy as three layers, not one blob:
| Layer | What you want | What it costs |
|---|---|---|
| Outer screen | Early hydrophone cues | High risk of detection |
| Inner escorts | Flank security | Depth-charge pressure after fire |
| Merchant column | Torpedo targets | Temptation to stay up too long |
Your job is to pick a lane, build a solution on one or two ships, and pre-draw egress before the first fish leaves the tube. The mid-article video shows why chart geometry — not arcade chasing — decides convoy outcomes.
Phase 0 — Decide whether to commit
Not every contact report deserves an attack. Before you close:
- Confirm own-ship state: fuel, torpedoes, battery, air — see Resources.
- Sketch a withdraw track on the chart that does not require surfacing into aircraft denser zones — Diving Cycles.
- Ask whether the geometry favors a beam shot or a messy stern chase. If you need heroic speed changes to reach Position Keeper lock, abort and wait for a better lane.
Career skippers who fire every time they hear screws lose reputation and boats. Read Career Progression for why patience pays.
Phase 1 — Screen reading on hydrophone
Open Hydrophone Tracking habits: pitch, RPM character, and bearing drift. Escorts often sound sharper and more urgent than heavy merchants. Plot timestamped bearings for the loudest contacts first — they are usually the ones that will kill you.
Do not raise the periscope to “just peek” at long range. Convoy air and surface lookouts punish curiosity. Stay chart-and-hydrophone until geometry forces a visual ID.
Phase 2 — Choose the attack geometry
Preferred patterns for Silent Shark’s instrument loop:
- Beam intercept: close from outside the screen, settle on a steady AoB, fire across the column’s path.
- Night or weather surface approach: when sea state and darkness hide you — see surface-attack discussion in Radio Room News — but still plan a dive exit.
- End-around: when the screen is thick ahead, track around the flank using map tools from Map Tools.
Avoid the center punch fantasy: charging through the middle of a screen almost always becomes an Evading Destroyers exam you did not schedule.
Phase 3 — Identify and range without living on the scope
When you must look, use Ship Identification and short Periscope exposures. Grab class, mast height, and a clean AoB estimate — Angle on Bow — then lower the scope. Feed the TDC immediately so the Position Keeper works while you stay dark.
Stadimeter cuts go stale. If the column zigzags, update range and speed before flooding tubes. Flooding early is noisy and wastes battery when you abort.
Phase 4 — Salvo discipline
Convoy doctrine is not “empty the boat.”
- Prefer aimed spreads on high-value merchants you can identify.
- Leave tubes for a second opportunity if the first salvo draws the screen toward a false contact.
- Watch gyro windows; a perfect solution with a late gyro is still a miss.
Use the printable Attack Checklist beside the chart until the sequence is automatic.
Phase 5 — Fire, then vanish on purpose
The shot is not the end of the attack — the first three minutes after fire are. Lower the scope, choose depth relative to the local thermal layer (Thermal Diving), and execute the egress track you drew in Phase 0. Change depth once with intent; thrashing through the layer announces your position.
If an escort already owns a bearing, slow and silent often beats flank panic. The Evading Destroyers guide covers the decision tree.
Campaign-specific convoy pressure
In the full Pacific career you also manage:
- Radio intel that may send you toward denser screens — Patrol Radio.
- Historical phases that thicken aircraft and escorts — Historical Events.
- Boat class limits on tubes and battery — Submarine Classes.
Demo generator convoys remain the best rehearsal hall even after 1.0. Skills transfer; wasted torpedoes in career do not.
Common convoy failures
- Treating the column as one TDC target instead of selecting a ship.
- Raising the scope for entertainment during the approach.
- Flooding all tubes before the solution stabilizes.
- Firing without a drawn egress.
- Celebrating a hit while still at periscope depth.
Practice plan (two hours)
- Generator: single merchant + one escort — perfect the checklist.
- Generator: small convoy, daylight — force short scope discipline.
- Generator: rain/night — practice surface-assisted approaches with a dive exit.
- Career: first real screened contact — apply Phase 0 abort criteria ruthlessly.
Related reading
Master convoy doctrine and the rest of Silent Shark’s Pacific war becomes a logistics and reputation game instead of a string of panic dives.
Frequently Asked Questions
Quick answers to the most common Silent Shark questions.
Should I attack every convoy I hear?
No. Check fuel, torpedoes, battery, aircraft risk, and whether geometry favors a beam shot. Aborting a bad intercept is good command — see [Career Progression](/campaign/career-progression/).
Can I practice convoy attacks without the campaign?
Yes. Use the free Demo’s scenario generator and standalone encounters, then apply the same doctrine in the full Pacific career.
What is the biggest convoy mistake for new skippers?
Living on the periscope and firing without a pre-drawn egress. Short looks, stable TDC inputs, then vanish — that order saves boats.