Silent Shark Map Tools and Plotting
The chart is your primary weapon — compass, ruler, timestamps, and intercept lines on the tactical map.
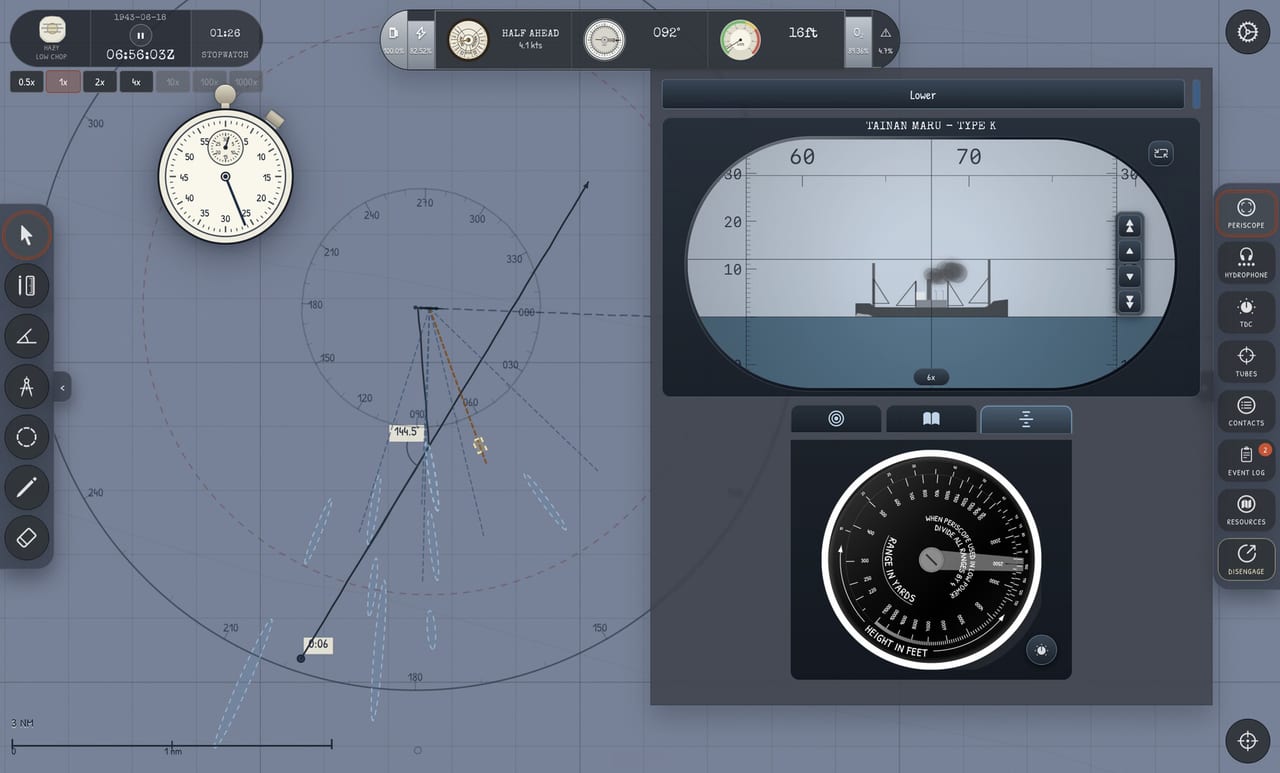
Silent Shark is map-first. The tactical chart is where contacts become intercepts, where four bearings become course and speed, and where you plan egress before escorts respond. Map tools — compass, ruler, timestamped points, and angle helpers — are not optional flavor; they are the core UI. John Goering’s design assumes you are comfortable plotting like a WWII plotting party, not clicking a target icon for an instant solution.
This page documents each tool and how professionals chain them into an attack. For walkthrough pacing, see Getting Started and First Patrol.
Tool overview
- Timestamped points — mark own-ship and contact observations with sim time for bearing plots.
- Ruler — measure distances to validate stadimeter range or closure rates.
- Compass / protractor — read course angles for own-ship and target tracks.
- Bearing lines — visualize hydrophone data; foundation of Four Bearings.
- Own-ship track — continuous record of turns; if wrong, every bearing line lies.
Timestamp discipline
Every hydrophone observation should appear on the chart within seconds of taking it. Mark own position at the observation time, not where you remember being thirty seconds later after switching stations. At moderate time compression, thirty seconds of sim time is enough for a merchant to move hundreds of yards — enough to miss a beam shot.
Use consistent symbols if your workflow allows: circle for own ship, dashed lines for bearings, solid arrow for derived target course. Consistency beats artistry; you will read this chart under stress after your first depth charge.
Typical plotting workflow
- Mark own position at hydrophone contact
T0. - Plot bearing lines at
T1,T2,T3,T4. - Derive target track vector from best-fit line motion.
- Draw intended intercept leg with favorable AoB for TDC.
- Annotate commit range for periscope depth descent.
- Pre-draw egress route off convoy axis — Evading Destroyers.
- Note thermal layer depth on margin if bathythermograph already read — Thermal Diving.
Steps six and seven separate survivors from first-kill casualties. Players who plot beautiful intercepts but invent egress under fire die equally often.
Intercept geometry without guesswork
Measure closure rate with the ruler between own-ship positions spaced by known time intervals. Compare against target track speed from bearings. If closure is too slow for fuel or patience, adjust course early — not after you are inside escort listen range.
AoB at firing moment should be intentional: beam shots forgive range error; bow shots demand fresh stadimeter cuts. Draw a small arc showing acceptable AoB window so you know when to abort the attack if geometry never enters that wedge.
Time compression interaction
Chart work quality drops when players over-compress time during bearing legs. The Basic Tutorial limits extreme compression for this reason. Use moderate compression on transit; drop to real-time or low compression during bearing collection.
Rule of thumb: if you cannot narrate aloud each bearing as it is taken, compression is too high. Demo patches disabled 1000× in Basic Tutorial specifically because skippers overshot intercepts — treat that as global advice.
Linking to other stations
| Chart output | Destination |
|---|---|
| Target course/speed | TDC |
| Commit range | Periscope + Stadimeter |
| Egress leg | Depth + telegraph orders |
| Patrol boundary | Campaign orders at launch |
Campaign scale
Demo generator maps are localized encounters. Full August 12, 2026 campaign uses broader Pacific routing — Pacific Overview — but the same toolset. Patrol orders may constrain where you plot intercepts relative to assigned zones. A contact outside your box may be legal tactically but costly strategically — Resources explains when to decline.
Common chart mistakes
| Mistake | Result | Fix |
|---|---|---|
| Forgetting own-ship turn | Fanning bearings | Mark turns immediately |
| One bearing only | Garbage TDC speed | Wait for four bearings |
| No egress line | Panic after torpedo | Pre-draw before commit |
| Ruler on wrong scale | False closure | Double-check units |
Mouse and keyboard habits
Pan and zoom fluently — Keyboard and Mouse — so you never skip plotting because the chart is awkward. External mouse recommended on laptops; ruler work on trackpads is painful during convoy scenarios.
Related
- Getting Started
- Hydrophone Tracking — bearing source.
- Controls — Stations — fast chart switching.
- Guides Hub — skill walkthroughs.
- Attack Checklist — chart ticks before fire.
Chart hygiene habits
Keep the chart readable. Delete obsolete marks after a contact is resolved. Color or label own-ship tracks differently from target tracks in your mind even if the UI uses simple lines. When time compression is active, pause before placing a bearing so the timestamp matches the observation you actually took.
Use the ruler to sanity-check stadimeter ranges. If the chart distance to your plotted track disagrees wildly with the stadimeter, one of the two is wrong — usually an outdated track. Fix the track before you trust the TDC.
Intercept geometry, not hope
Draw the intercept you want: target track, your approach course, intended AoB at commit, and a withdrawal vector that does not cross the screen. Hope is not a vector. If the geometry requires a hero dash through escorts, redesign the approach on paper first.
Teaching tools for new skippers
New players should open Getting Started with the chart tools panel visible. Every tutorial prompt that mentions a bearing should produce a visible line. If you cannot see the line, you did not learn the lesson yet.
Campaign-scale plotting
On Pacific patrols after launch, you will plot at two scales: operational routing toward a zone, then tactical plotting inside an encounter. The tools are the same; the stakes differ because fuel and torpedoes are finite — campaign resources. Practice tidy charts now so operational maps do not become spaghetti.
Related practice path
Frequently Asked Questions
Quick answers to the most common Silent Shark questions.
Why are timestamped points important on the Silent Shark chart?
They tie hydrophone bearings to sim time so you can estimate target speed and course — the basis of the four bearings method.
Can I intercept without using map tools?
Not reliably. The game is designed around chart plotting; skipping tools leaves you guessing TDC inputs.
Do map tools change in the full campaign?
Core tools remain the same. Campaign adds larger operational areas and patrol boundaries, not a different chart interface.